Поделиться

Lesson 15. Methods for arranging, aligning and combining objects in CorelDRAW.
Objectives: Introduce students to methods for organizing and combining objects in CorelDRAW.
Requirements for knowledge and skills:
Students should know:
- basic concepts: ordering, alignment, grouping, combining, welding;
- what commands are used to change the order of the objects;
- features of operations of grouping, combining, welding;
- the purpose of the trim operation.
Students should be able to:
- perform ordering, mutual alignment of objects in the CorelDRAW program;
- apply grouping, combining and welding operations to objects;
- exclude some objects from others.
Didactic software: PC, presentation, vector graphics editor CorelDRAW.
Lesson plan.
The course of the lesson.
I. Setting the objectives of the lesson.
II. Presentation of new material.
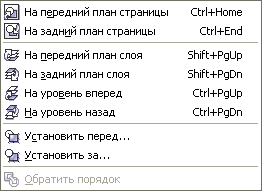
Ordering objects
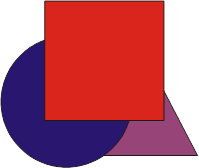
In CorelDRAW, all objects are arranged in a specific order.
Ordering objects - changing the relative position of objects relative to each other.
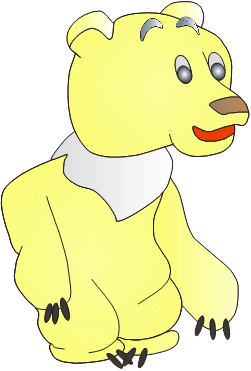
Keep in mind that the last drawn object is always placed in front of all previously created objects. In Fig. 1, a, the objects are shown in the following order: rectangle-background, ice floes, bear.
![]()
![]()
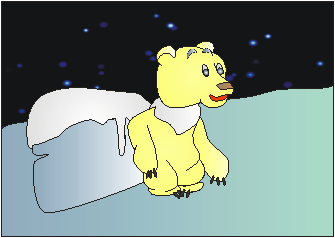

CorelDRAW provides commands that you can use to change the order of objects. The command Above all places the selected objects in front of others. This is how the ice floe was displaced in Fig. 1, b. The command Below all has the opposite effect. It sets the selected objects to the farthest (bottom). If you apply this command to the objects that make up the bear, it will "hide" behind the rectangle - the background. In addition, you can specify in front or behind which object to place the selected object.
Aligning objects
Alignment - accurate placement of objects on the worksheet and relative to each other.

 An
object can be aligned to the center or to different sides of another object.
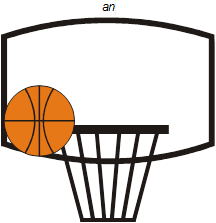
Figure 2 shows several possible alignment options for objects (relative to a
basketball backboard). In addition, any object can be easily positioned
precisely in the center of the worksheet.
An
object can be aligned to the center or to different sides of another object.
Figure 2 shows several possible alignment options for objects (relative to a
basketball backboard). In addition, any object can be easily positioned
precisely in the center of the worksheet.
 |
|||||||||
 |
|||||||||
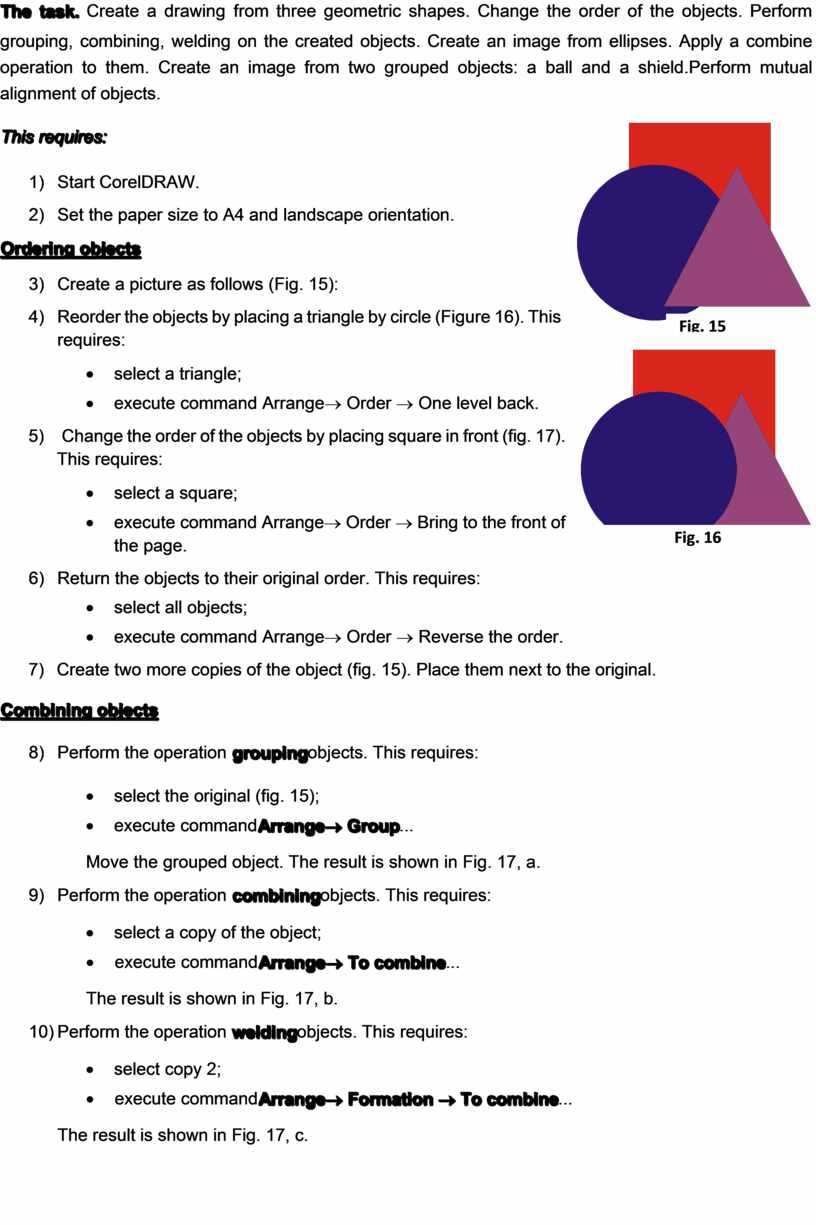
Methods for combining objects
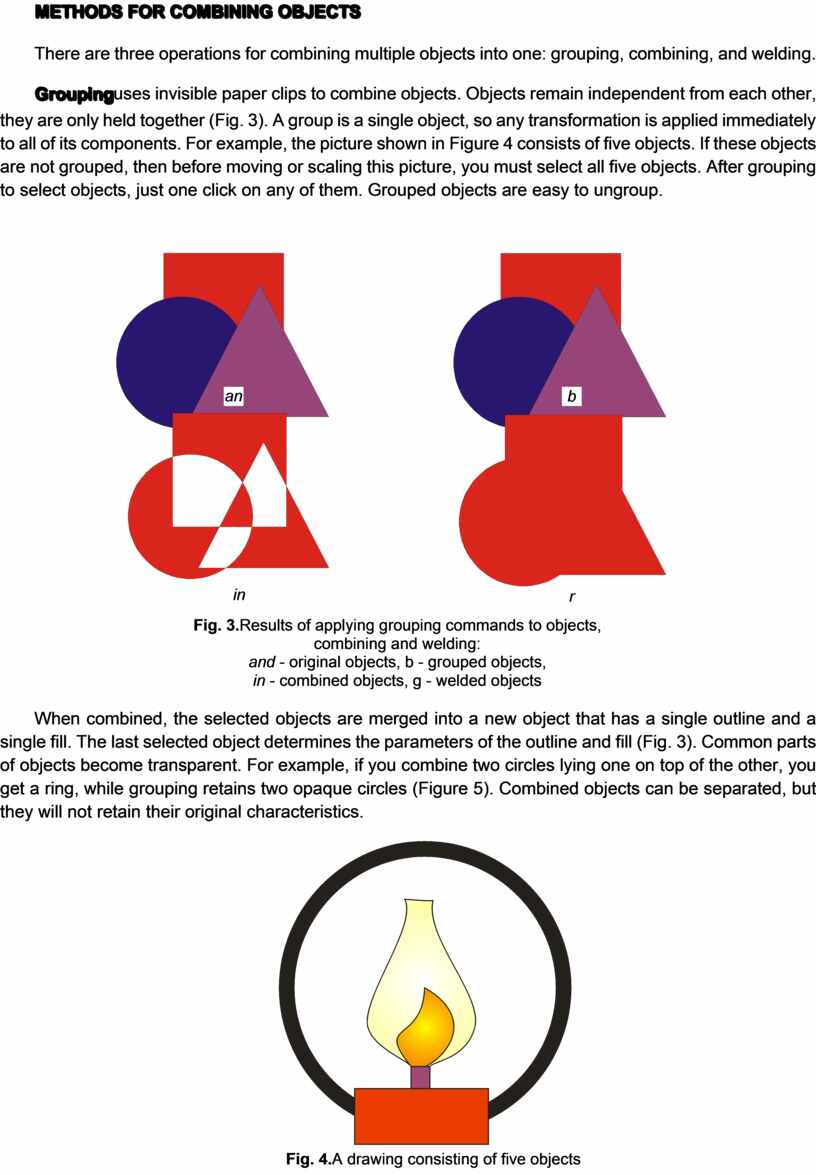
There are three operations for combining multiple objects into one: grouping, combining, and welding.
 Groupinguses invisible paper clips to combine
objects. Objects remain independent from each other, they are only held
together (Fig. 3). A group is a single object, so any transformation is applied
immediately to all of its components. For example, the picture shown in Figure
4 consists of five objects. If these objects are not grouped, then before
moving or scaling this picture, you must select all five objects. After
grouping to select objects, just one click on any of them. Grouped objects are
easy to ungroup.
Groupinguses invisible paper clips to combine
objects. Objects remain independent from each other, they are only held
together (Fig. 3). A group is a single object, so any transformation is applied
immediately to all of its components. For example, the picture shown in Figure
4 consists of five objects. If these objects are not grouped, then before
moving or scaling this picture, you must select all five objects. After
grouping to select objects, just one click on any of them. Grouped objects are
easy to ungroup.
 |
|||||||||||
 |
|||||||||||
 |
|||||||||||
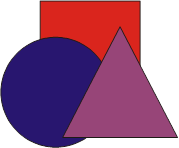
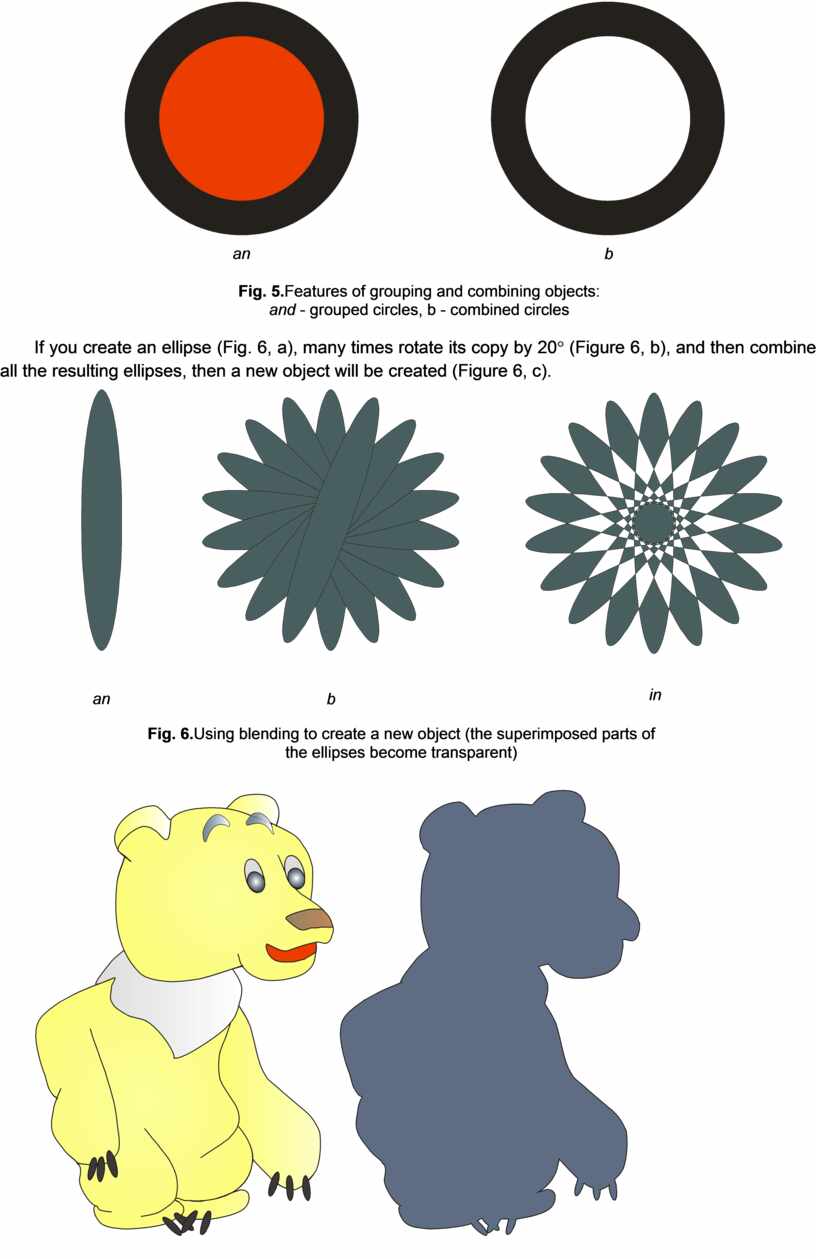
When combined, the selected objects are merged into a new object that has a single outline and a single fill. The last selected object determines the parameters of the outline and fill (Fig. 3). Common parts of objects become transparent. For example, if you combine two circles lying one on top of the other, you get a ring, while grouping retains two opaque circles (Figure 5). Combined objects can be separated, but they will not retain their original characteristics.
![]()

![]()
![]()


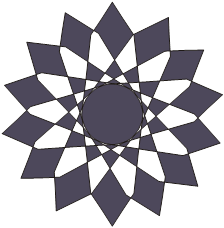
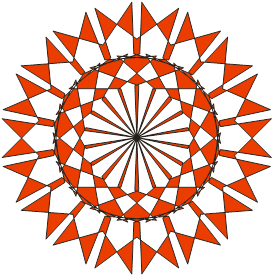
![]() If you create an ellipse (Fig. 6, a),
many times rotate its copy by 20° (Figure 6, b), and then combine all the
resulting ellipses, then a new object will be created (Figure 6, c).
If you create an ellipse (Fig. 6, a),
many times rotate its copy by 20° (Figure 6, b), and then combine all the
resulting ellipses, then a new object will be created (Figure 6, c).

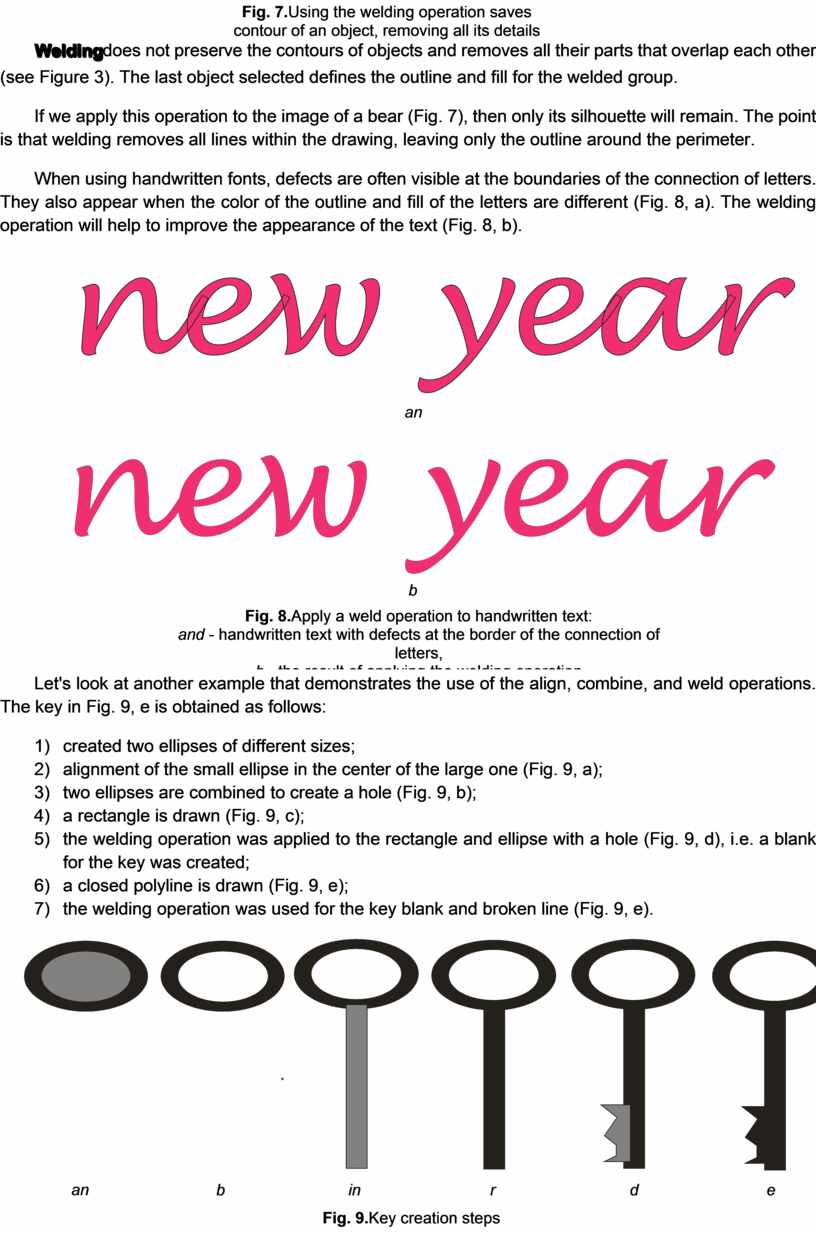
Weldingdoes not preserve the contours of objects and removes all their parts that overlap each other (see Figure 3). The last object selected defines the outline and fill for the welded group.
If we apply this operation to the image of a bear (Fig. 7), then only its silhouette will remain. The point is that welding removes all lines within the drawing, leaving only the outline around the perimeter.
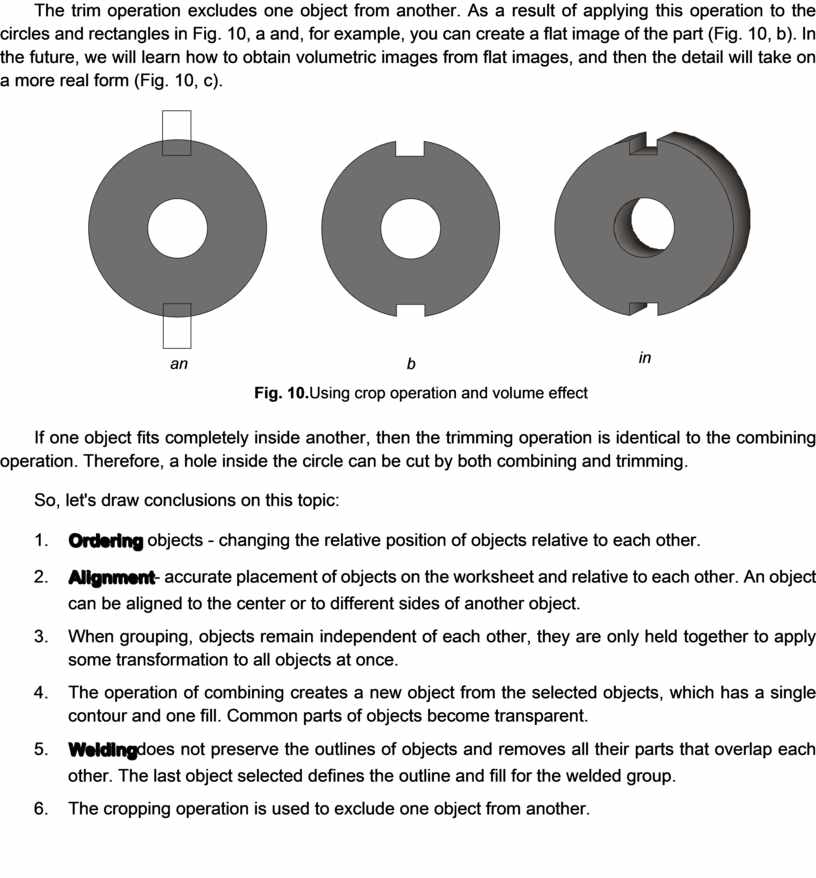
When using handwritten fonts, defects are often visible at the boundaries of the connection of letters. They also appear when the color of the outline and fill of the letters are different (Fig. 8, a). The welding operation will help to improve the appearance of the text (Fig. 8, b).
![]()

![]()

 |
Let's look at another example that demonstrates the use of the align, combine, and weld operations. The key in Fig. 9, e is obtained as follows:
1) created two ellipses of different sizes;
2) alignment of the small ellipse in the center of the large one (Fig. 9, a);
3) two ellipses are combined to create a hole (Fig. 9, b);
4) a rectangle is drawn (Fig. 9, c);
5) the welding operation was applied to the rectangle and ellipse with a hole (Fig. 9, d), i.e. a blank for the key was created;
6) a closed polyline is drawn (Fig. 9, e);
7) the welding operation was used for the key blank and broken line (Fig. 9, e).
![]()
![]()
![]()
![]()
![]()
![]()
![]()

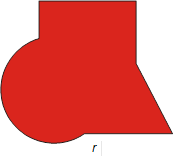
The trim operation excludes one object from another. As a result of applying this operation to the circles and rectangles in Fig. 10, a and, for example, you can create a flat image of the part (Fig. 10, b). In the future, we will learn how to obtain volumetric images from flat images, and then the detail will take on a more real form (Fig. 10, c).
![]()
![]()
![]()
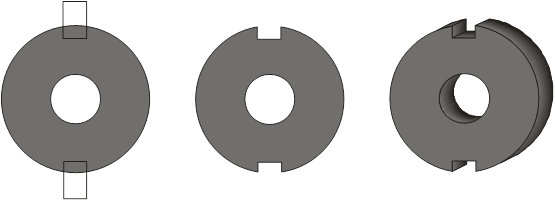
If one object fits completely inside another, then the trimming operation is identical to the combining operation. Therefore, a hole inside the circle can be cut by both combining and trimming.
So, let's draw conclusions on this topic:
1. Ordering objects - changing the relative position of objects relative to each other.
2. Alignment- accurate placement of objects on the worksheet and relative to each other. An object can be aligned to the center or to different sides of another object.
3. When grouping, objects remain independent of each other, they are only held together to apply some transformation to all objects at once.
4. The operation of combining creates a new object from the selected objects, which has a single contour and one fill. Common parts of objects become transparent.
5. Weldingdoes not preserve the outlines of objects and removes all their parts that overlap each other. The last object selected defines the outline and fill for the welded group.
6. The cropping operation is used to exclude one object from another.
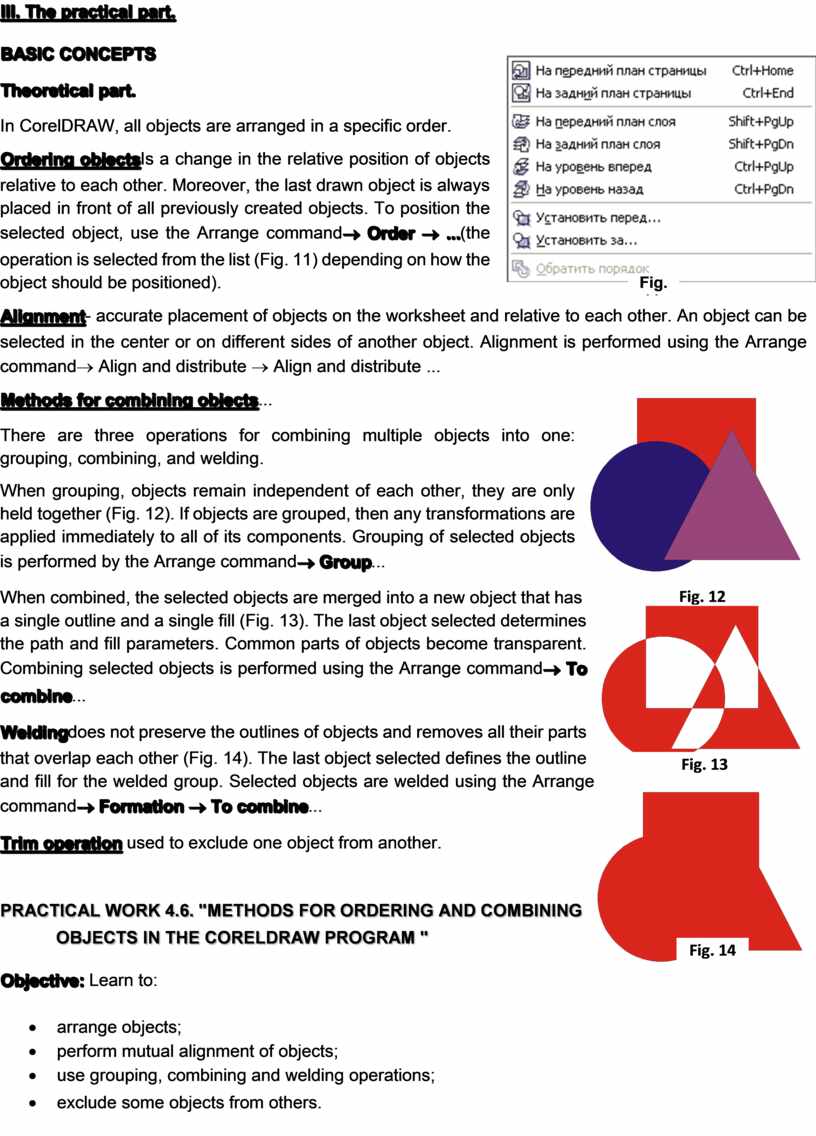
III. The practical part.
 Basic concepts
Theoretical part.
In CorelDRAW, all objects are arranged in a specific order.
![]() Ordering objectsIs a change in the relative position of
objects relative to each other. Moreover, the last drawn object is always
placed in front of all previously created objects. To position the selected
object, use the Arrange command® Order ®
...(the operation is
selected from the list (Fig. 11) depending on how the object should be
positioned).
Ordering objectsIs a change in the relative position of
objects relative to each other. Moreover, the last drawn object is always
placed in front of all previously created objects. To position the selected
object, use the Arrange command® Order ®
...(the operation is
selected from the list (Fig. 11) depending on how the object should be
positioned).
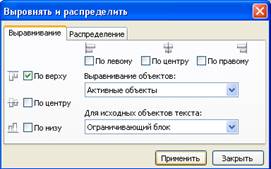
Alignment- accurate placement of objects on the worksheet and relative to each other. An object can be selected in the center or on different sides of another object. Alignment is performed using the Arrange command® Align and distribute ® Align and distribute ...
 Methods
for combining objects...
Methods
for combining objects...
There are three operations for combining multiple objects into one: grouping, combining, and welding.
![]() When
grouping, objects remain independent of each other, they are only held together
(Fig. 12). If objects are grouped, then any transformations are applied
immediately to all of its components. Grouping of selected objects is performed
by the Arrange command® Group...
When
grouping, objects remain independent of each other, they are only held together
(Fig. 12). If objects are grouped, then any transformations are applied
immediately to all of its components. Grouping of selected objects is performed
by the Arrange command® Group...
 When
combined, the selected objects are merged into a new object that has a single
outline and a single fill (Fig. 13). The last object selected determines the
path and fill parameters. Common parts of objects become transparent. Combining
selected objects is performed using the Arrange command®
To combine...
When
combined, the selected objects are merged into a new object that has a single
outline and a single fill (Fig. 13). The last object selected determines the
path and fill parameters. Common parts of objects become transparent. Combining
selected objects is performed using the Arrange command®
To combine...

![]() Weldingdoes not preserve the outlines of
objects and removes all their parts that overlap each other (Fig. 14). The last
object selected defines the outline and fill for the welded group. Selected
objects are welded using the Arrange command® Formation ®
To combine...
Weldingdoes not preserve the outlines of
objects and removes all their parts that overlap each other (Fig. 14). The last
object selected defines the outline and fill for the welded group. Selected
objects are welded using the Arrange command® Formation ®
To combine...
Trim operation used to exclude one object from another.
Practical work 4.6. "![]() methods for ordering and combining objects in the Coreldraw program
"
methods for ordering and combining objects in the Coreldraw program
"
Objective: Learn to:
· arrange objects;
· perform mutual alignment of objects;
· use grouping, combining and welding operations;
· exclude some objects from others.
The task. Create a drawing from three geometric
shapes. Change the order of the objects. Perform grouping, combining, welding
on the created objects. Create an image from ellipses. Apply a combine
operation to them. Create an image from two grouped objects: a ball and a
shield.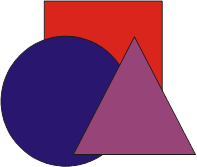 Perform
mutual alignment of objects.
Perform
mutual alignment of objects.
This requires:
1) Start CorelDRAW.
2) Set the paper size to A4 and landscape orientation.
Ordering objects
3)
 Create a
picture as follows (Fig. 15):
Create a
picture as follows (Fig. 15):
4)
![]() Reorder the objects by placing a
triangle by circle (Figure 16). This requires:
Reorder the objects by placing a
triangle by circle (Figure 16). This requires:
· select a triangle;
· execute command Arrange® Order ® One level back.
5) Change the order of the objects by
placing ![]() square in front (fig. 17). This
requires:
square in front (fig. 17). This
requires:
· select a square;
· execute command Arrange® Order ® Bring to the front of the page.
6) Return the objects to their original order. This requires:
· select all objects;
· execute command Arrange® Order ® Reverse the order.
7) Create two more copies of the object (fig. 15). Place them next to the original.
Combining objects
8) Perform the operation groupingobjects. This requires:
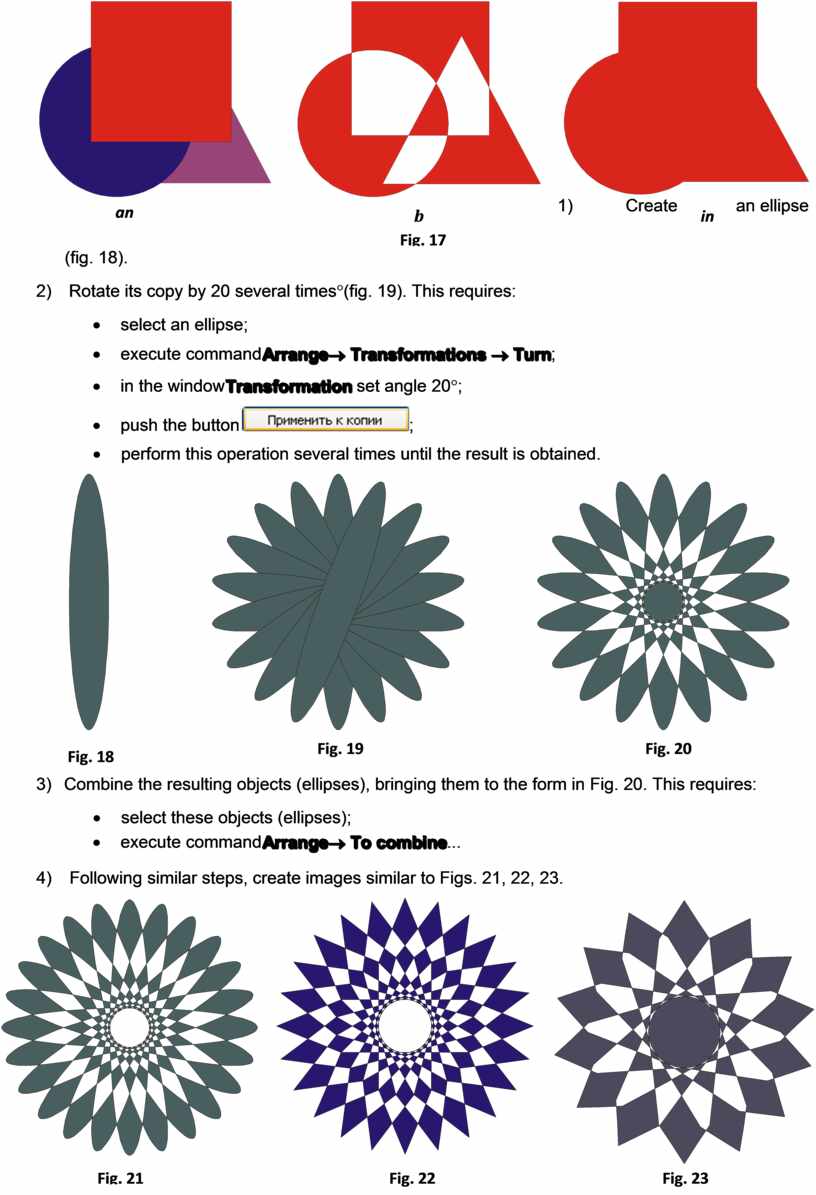
· select the original (fig. 15);
· execute commandArrange® Group...
Move the grouped object. The result is shown in Fig. 17, a.
9) Perform the operation combiningobjects. This requires:
· select a copy of the object;
· execute commandArrange® To combine...
The result is shown in Fig. 17, b.
10) Perform the operation weldingobjects. This requires:
· select copy 2;
· execute commandArrange® Formation ® To combine...
The result is shown in Fig. 17, c.
11) ![]()
![]()
![]()
![]()


 Create an ellipse (fig. 18).
12) Rotate its copy by 20 several times°(fig. 19). This requires:
· select an ellipse;
· execute commandArrange® Transformations ® Turn;
· in the windowTransformation set angle 20°;
·
push the button![]() ;
;
· perform this operation several times until the result is obtained.
 |
 |
![]()
![]()
![]()
13) Combine the resulting objects (ellipses), bringing them to the form in Fig. 20. This requires:
· select these objects (ellipses);
· execute commandArrange® To combine...
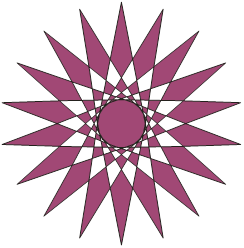
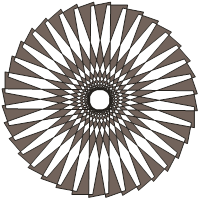
14) Following similar steps, create images similar to Figs. 21, 22, 23.


![]()
![]()
![]()
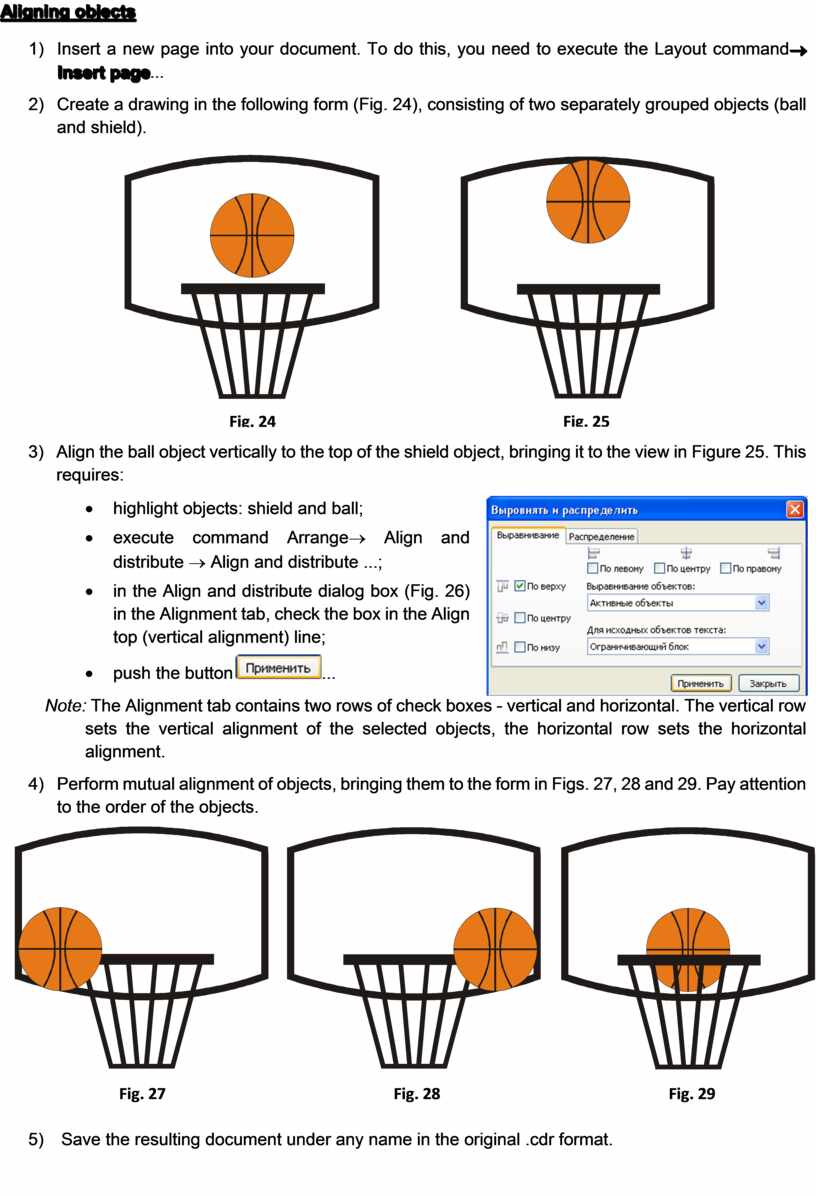
Aligning objects
15) Insert a new page into your document. To do this, you need to execute the Layout command® Insert page...
16) Create a drawing in the following form (Fig. 24), consisting of two separately grouped objects (ball and shield).
 |
 |
||
![]()
![]()
17)  Align the ball object vertically to the
top of the shield object, bringing it to the view in Figure 25. This requires:
Align the ball object vertically to the
top of the shield object, bringing it to the view in Figure 25. This requires:
· highlight objects: shield and ball;
· execute command Arrange® Align and distribute ® Align and distribute ...;
· in the Align and distribute dialog box (Fig. 26) in the Alignment tab, check the box in the Align top (vertical alignment) line;
·
![]() push
the button
push
the button![]() ...
...
Note: The Alignment tab contains two rows of check boxes - vertical and horizontal. The vertical row sets the vertical alignment of the selected objects, the horizontal row sets the horizontal alignment.
18) Perform mutual alignment of objects, bringing them to the form in Figs. 27, 28 and 29. Pay attention to the order of the objects.
 |
|||||
 |
 |
||||
![]()
![]()
![]()
19) Save the resulting document under any name in the original .cdr format.
IV. Consolidation of the learned.
To consolidate what was learned, you need to ask the children to answer the questions:
1. How can you change the order of objects?
2. How many objects in Fig. 1 need to be selected before bringing the ice floe to the front?
3. What operation should be applied in order to easily manipulate the bear image in Figure 1 as a single object?
4. How is the grouping operation different from the combine operation?
5. Which objects can be conveniently created using the weld operation?
6. When is the trimming operation used?
7. What operations can you use to cut a hole, for example, in the center of a square?
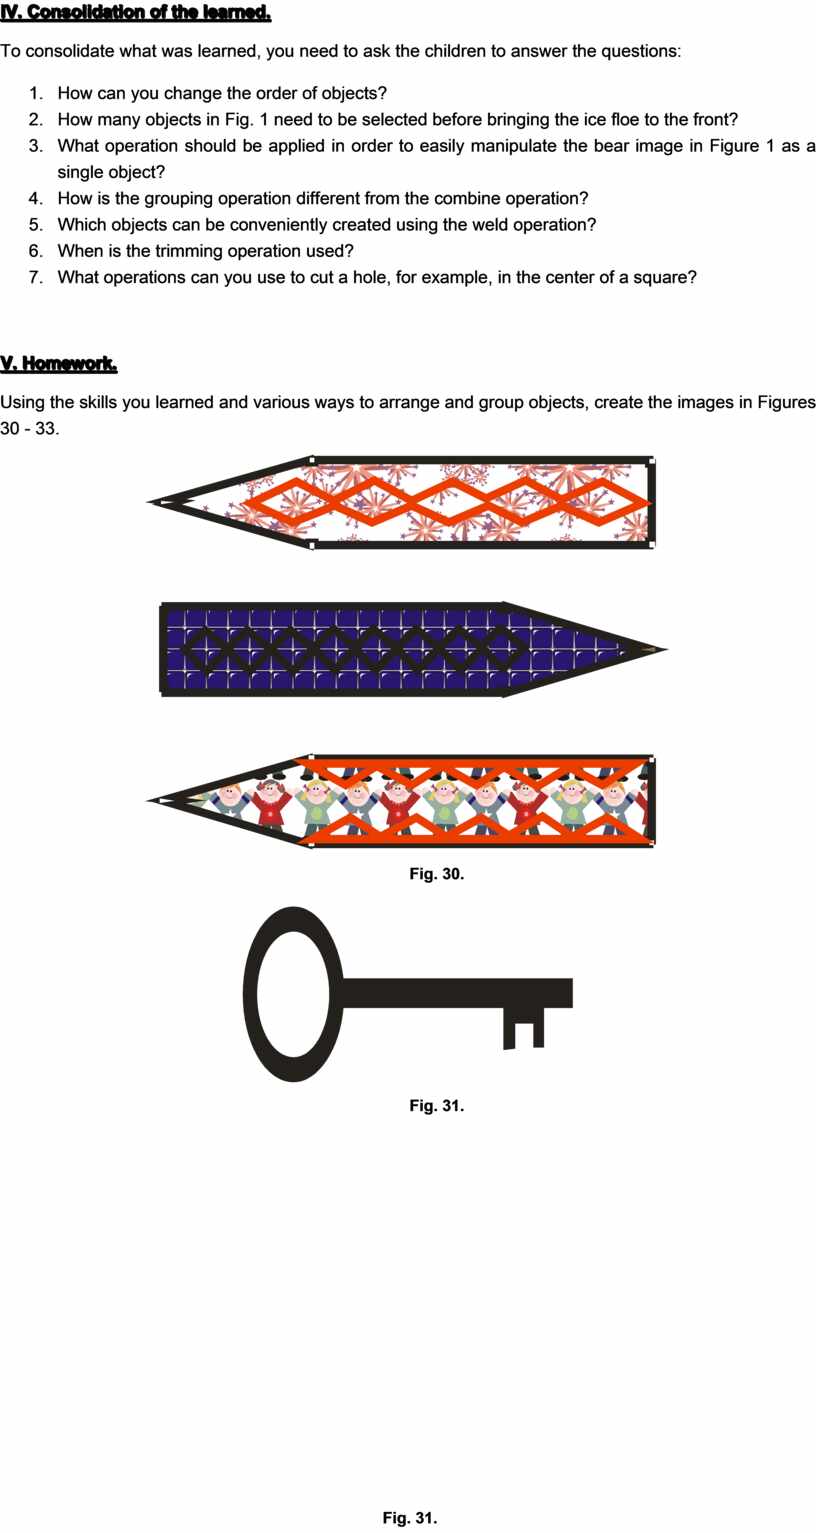
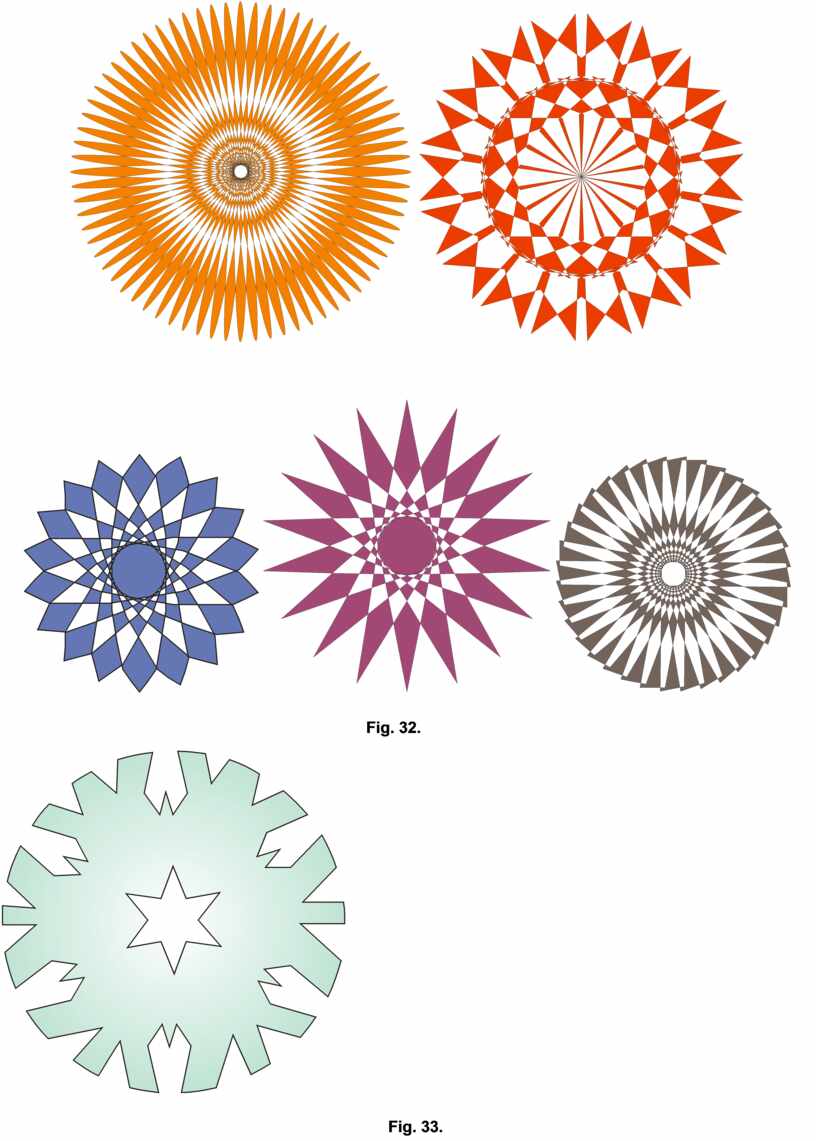
V. Homework.
Using the skills you learned and various ways to arrange and group objects, create the images in Figures 30 - 33.
![]()
![]()


![]()

Материалы на данной страницы взяты из открытых источников либо размещены пользователем в соответствии с договором-офертой сайта. Вы можете сообщить о нарушении.