Поделиться
|
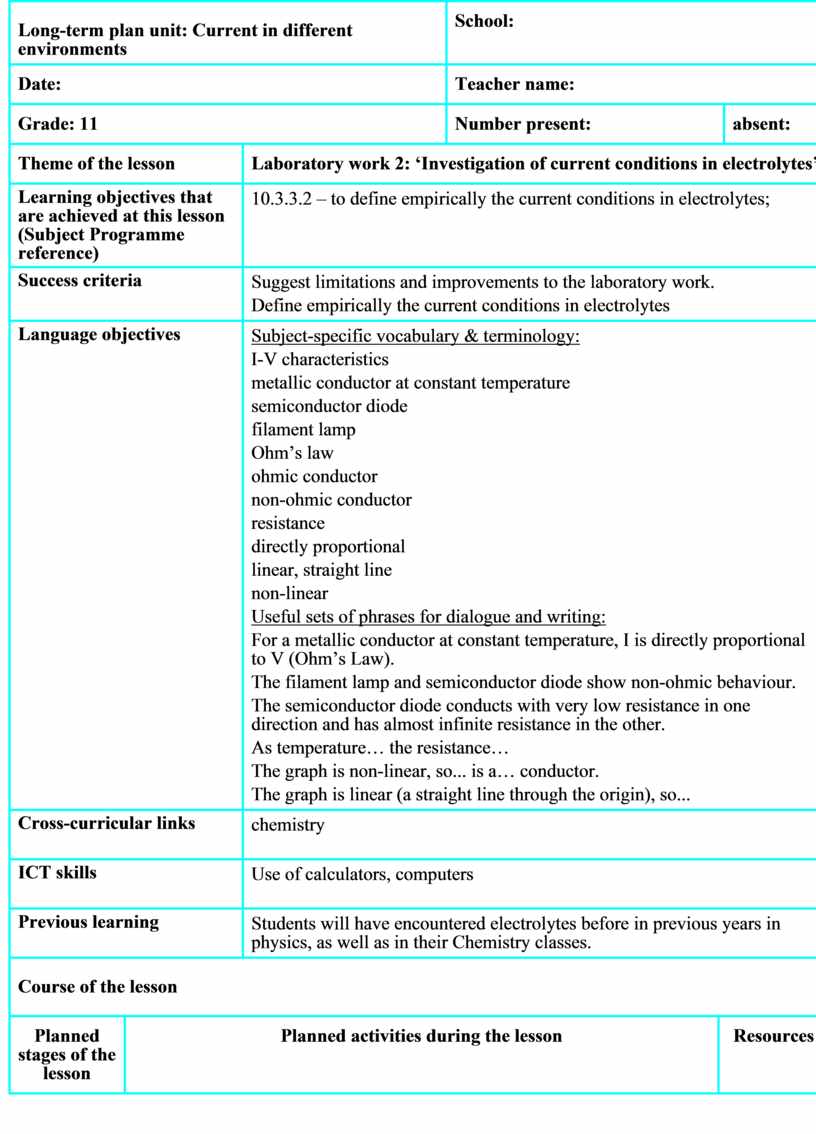
Long-term plan unit: Current in different environments |
School: |
|||||||
|
Date: |
Teacher name: |
|||||||
|
Grade: 11 |
Number present: |
absent: |
||||||
|
Theme of the lesson |
Laboratory work 2: ‘Investigation of current conditions in electrolytes’ |
|||||||
|
Learning objectives that are achieved at this lesson (Subject Programme reference) |
10.3.3.2 – to define empirically the current conditions in electrolytes; |
|||||||
|
Success criteria |
Suggest limitations and improvements to the laboratory work. Define empirically the current conditions in electrolytes |
|||||||
|
Language objectives |
Subject-specific vocabulary & terminology: I-V characteristics metallic conductor at constant temperature semiconductor diode filament lamp Ohm’s law ohmic conductor non-ohmic conductor resistance directly proportional linear, straight line non-linear Useful sets of phrases for dialogue and writing: For a metallic conductor at constant temperature, I is directly proportional to V (Ohm’s Law). The filament lamp and semiconductor diode show non-ohmic behaviour. The semiconductor diode conducts with very low resistance in one direction and has almost infinite resistance in the other. As temperature… the resistance… The graph is non-linear, so... is a… conductor. The graph is linear (a straight line through the origin), so... |
|||||||
|
Cross-curricular links |
chemistry |
|||||||
|
ICT skills |
Use of calculators, computers |
|||||||
|
Previous learning
|
Students will have encountered electrolytes before in previous years in physics, as well as in their Chemistry classes. |
|||||||
|
Course of the lesson |
||||||||
|
Planned stages of the lesson |
Planned activities during the lesson |
Resources |
||||||
|
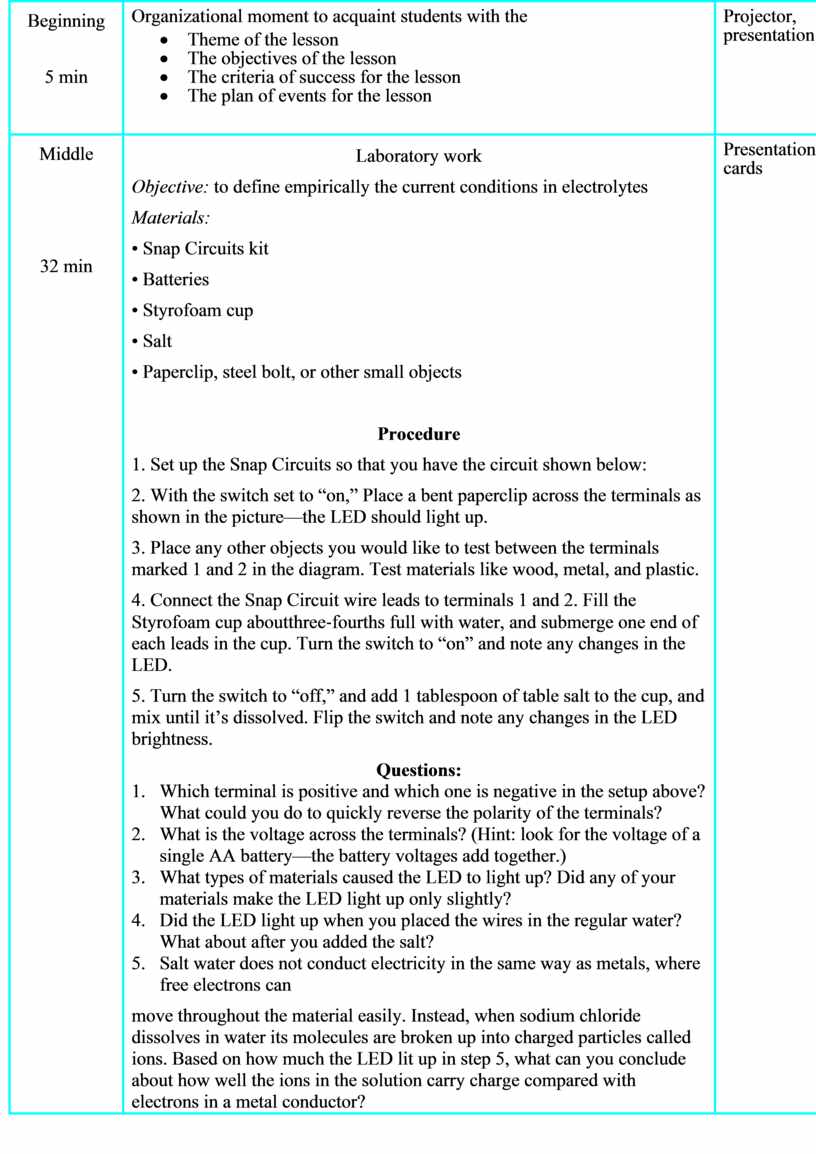
Beginning
5 min
|
Organizational moment to acquaint students with the · Theme of the lesson · The objectives of the lesson · The criteria of success for the lesson · The plan of events for the lesson
|
Projector, presentation |
||||||
|
Middle
32 min
|
Laboratory work Objective: to define empirically the current conditions in electrolytes Materials: • Snap Circuits kit • Batteries • Styrofoam cup • Salt • Paperclip, steel bolt, or other small objects
Procedure 1. Set up the Snap Circuits so that you have the circuit shown below: 2. With the switch set to “on,” Place a bent paperclip across the terminals as shown in the picture—the LED should light up. 3. Place any other objects you would like to test between the terminals marked 1 and 2 in the diagram. Test materials like wood, metal, and plastic. 4. Connect the Snap Circuit wire leads to terminals 1 and 2. Fill the Styrofoam cup aboutthree‐fourths full with water, and submerge one end of each leads in the cup. Turn the switch to “on” and note any changes in the LED. 5. Turn the switch to “off,” and add 1 tablespoon of table salt to the cup, and mix until it’s dissolved. Flip the switch and note any changes in the LED brightness. Questions: 1. Which terminal is positive and which one is negative in the setup above? What could you do to quickly reverse the polarity of the terminals? 2. What is the voltage across the terminals? (Hint: look for the voltage of a single AA battery—the battery voltages add together.) 3. What types of materials caused the LED to light up? Did any of your materials make the LED light up only slightly? 4. Did the LED light up when you placed the wires in the regular water? What about after you added the salt? 5. Salt water does not conduct electricity in the same way as metals, where free electrons can move throughout the material easily. Instead, when sodium chloride dissolves in water its molecules are broken up into charged particles called ions. Based on how much the LED lit up in step 5, what can you conclude about how well the ions in the solution carry charge compared with electrons in a metal conductor? |
Presentation, cards
|
||||||
|
End
3 min |
Reflection: Have students answer the following questions on post it notes or small pieces of paper. - What have you learned? - What remains unclear? - What do you still need to work on? |
|
||||||
|
Differentiation – how do you plan to give more support? How do you plan to challenge the more able learners? |
Assessment – how are you planning to check students’ learning? |
Health and safety regulations |
||||||
|
Students who have questions about the language can also consult with teachers for help with terms or instructions that they do not understand. |
Students will be assessed on the accuracy and quality of their calculations on the laboratory work itself. Additionally, during the lesson, teachers will circulate, making sure that students are performing the lab safely and correctly setting up the apparata. Students who are making mistakes in the set up of their lab will be asked to explain their reasoning, and provided guidance if they are unable to find their own mistakes. |
Students will be encouraged to take a 1-2 minute stretch break near the middle of both lessons. |
||||||
|
Reflection
Were the lesson objectives/learning objectives realistic? Did all learners achieve the LO? If not, why? Did my planned differentiation work well? Did I stick to timings? What changes did I make from my plan and why?
|
Use the space below to reflect on your lesson. Answer the most relevant questions from the box on the left about your lesson. |
|||||||
|
|
||||||||
|
Summary evaluation
What two things went really well (consider both teaching and learning)? 1:
2:
What two things would have improved the lesson (consider both teaching and learning)? 1:
2:
What have I learned from this lesson about the class or achievements/difficulties of individuals that will inform my next lesson?
|
||||||||
Материалы на данной страницы взяты из открытых источников либо размещены пользователем в соответствии с договором-офертой сайта. Вы можете сообщить о нарушении.