Поделиться

|
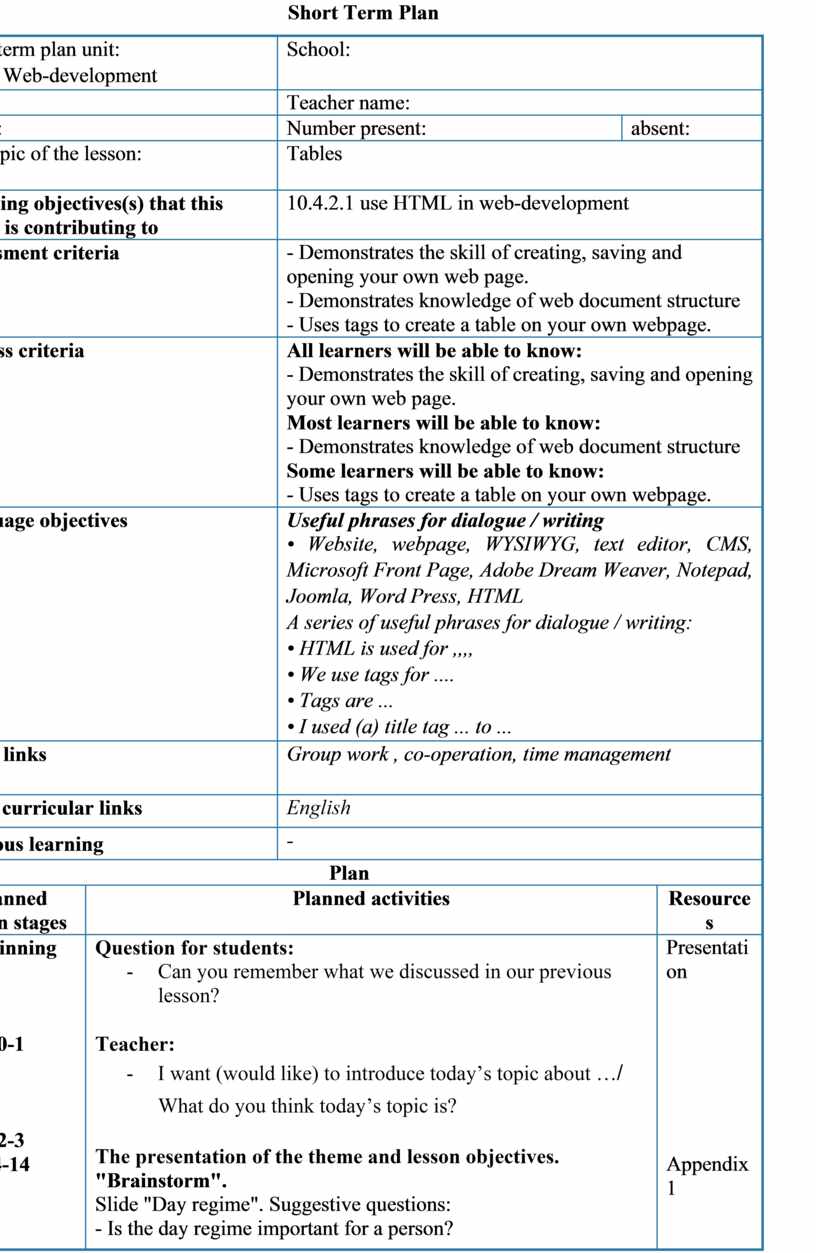
Long-term plan unit: 10.4А Web-development |
School: |
||||
|
Date: |
Teacher name: |
||||
|
Grade: |
Number present: |
absent: |
|||
|
The topic of the lesson:
|
Tables |
||||
|
Learning objectives(s) that this lesson is contributing to |
10.4.2.1 use HTML in web-development |
||||
|
Assessment criteria |
- Demonstrates the skill of creating, saving and opening your own web page. - Demonstrates knowledge of web document structure - Uses tags to create a table on your own webpage. |
||||
|
Success criteria |
All learners will be able to know: - Demonstrates the skill of creating, saving and opening your own web page. Most learners will be able to know: - Demonstrates knowledge of web document structure Some learners will be able to know: - Uses tags to create a table on your own webpage. |
||||
|
Language objectives
|
Useful phrases for dialogue / writing • Website, webpage, WYSIWYG, text editor, CMS, Microsoft Front Page, Adobe Dream Weaver, Notepad, Joomla, Word Press, HTML A series of useful phrases for dialogue / writing: • HTML is used for ,,,, • We use tags for .... • Tags are ... • I used (a) title tag ... to ... |
||||
|
Value links |
Group work , co-operation, time management |
||||
|
Cross curricular links |
English |
||||
|
Previous learning |
- |
||||
|
Plan |
|||||
|
Planned lesson stages |
Planned activities |
Resources |
|||
|
Beginning
0-1
2-3 4-14 |
Question for students: - Can you remember what we discussed in our previous lesson?
Teacher: - I want (would like) to introduce today’s topic about …/ What do you think today’s topic is?
The presentation of the theme and lesson objectives. "Brainstorm". Slide "Day regime". Suggestive questions: - Is the day regime important for a person? - What software can I use to save this data? (Word, Excel) - What is the data structure in Excel (tabular) The teacher should bring questions to the topic "Tables". The teacher introduces the syntax |
Presentation
Appendix 1
Appendix 2 |
|||
|
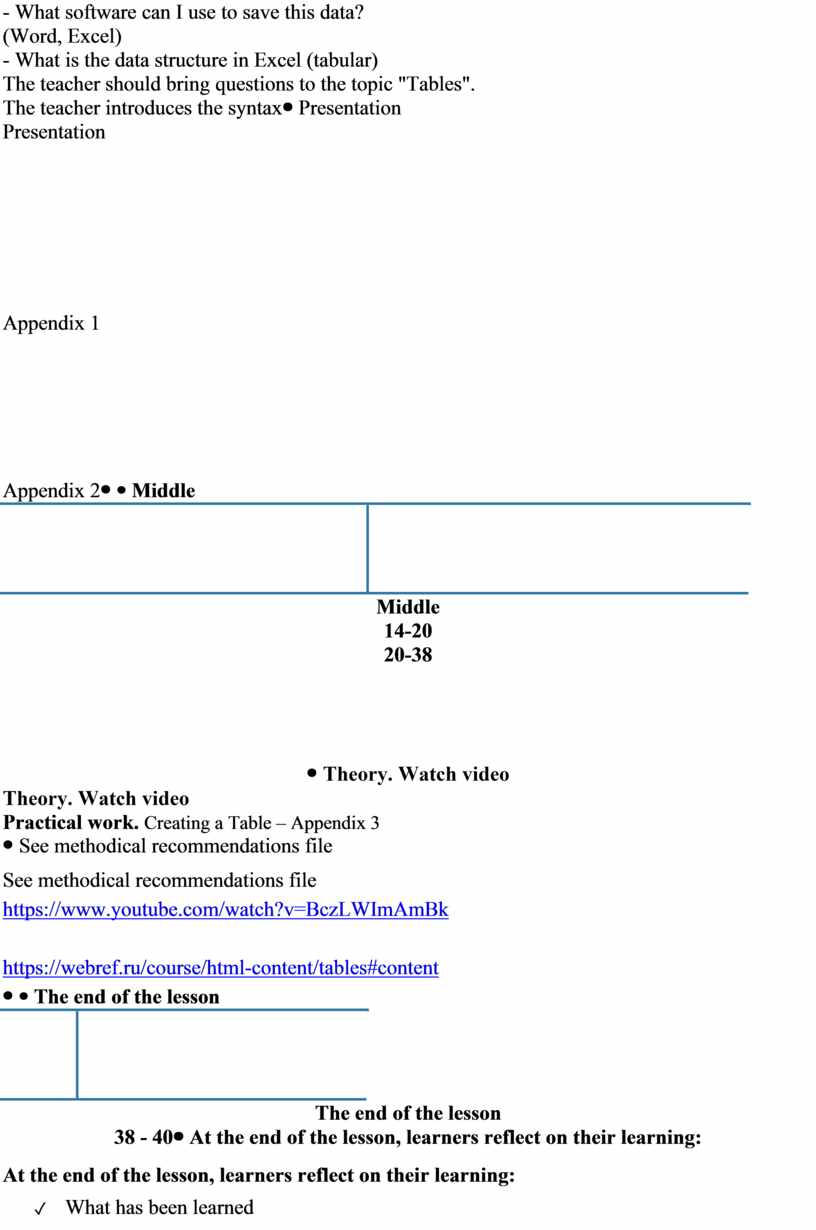
Middle 14-20 20-38
|
Theory. Watch video Practical work. Creating a Table – Appendix 3
|
See methodical recommendations file https://www.youtube.com/watch?v=BczLWImAmBk
https://webref.ru/course/html-content/tables#content
|
|||
|
The end of the lesson 38 - 40 |
At the end of the lesson, learners reflect on their learning: ✓ What has been learned ✓ What remained unclear ✓ What needs more attention
|
|
|||
|
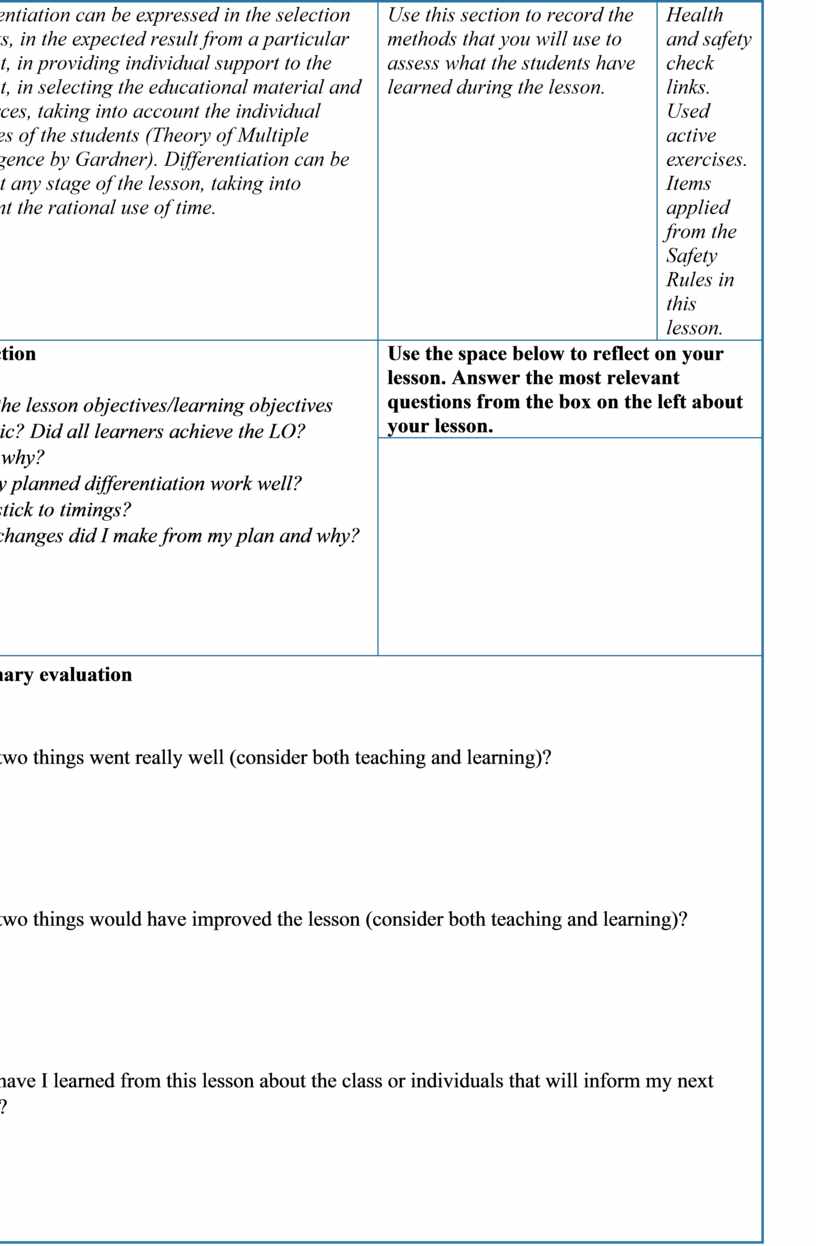
Differentiation – how do you plan to give more support? How do you plan to challenge the more able learners? |
Assessment – how are you planning to check learners’ learning? |
Health and safety check |
|||
|
Differentiation can be expressed in the selection of tasks, in the expected result from a particular student, in providing individual support to the student, in selecting the educational material and resources, taking into account the individual abilities of the students (Theory of Multiple Intelligence by Gardner). Differentiation can be used at any stage of the lesson, taking into account the rational use of time. |
Use this section to record the methods that you will use to assess what the students have learned during the lesson.
|
Health and safety check links. Used active exercises. Items applied from the Safety Rules in this lesson. |
|||
|
Reflection
Were the lesson objectives/learning objectives realistic? Did all learners achieve the LO? If not, why? Did my planned differentiation work well? Did I stick to timings? What changes did I make from my plan and why?
|
Use the space below to reflect on your lesson. Answer the most relevant questions from the box on the left about your lesson. |
||||
|
|
|||||
|
Summary evaluation
What two things went really well (consider both teaching and learning)?
1:
2:
What two things would have improved the lesson (consider both teaching and learning)?
1:
2:
What have I learned from this lesson about the class or individuals that will inform my next lesson?
|
|||||
Appendix 1
Appendix 2
• open <table>;
• add lines through <tr>;
• add regular cells through <td> or upper-level cells through <th>.
This hierarchy is required and all three elements are required to build the table.
When writing code, you need to define the cells of your table from left to right and so on to the bottom.
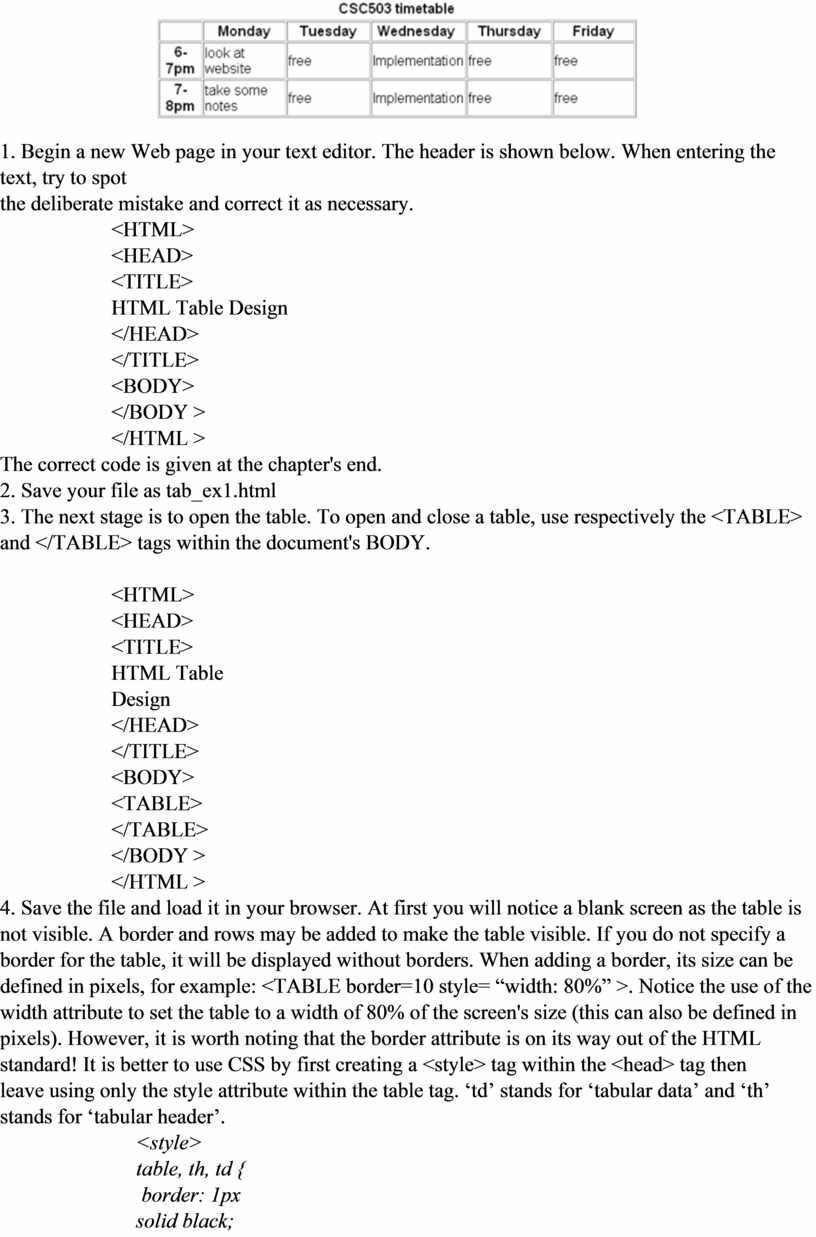
Appendix 3
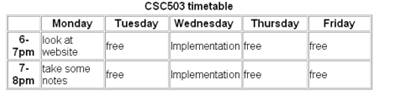
The objective of this Activity is to create a timetable for CSC5003 students to be displayed on a Web page as
shown below:
1. Begin a new Web page in your text editor. The header is shown below. When entering the text, try to spot
the deliberate mistake and correct it as necessary.
<HTML>
<HEAD>
<TITLE>
HTML Table Design
</HEAD>
</TITLE>
<BODY>
</BODY >
</HTML >
The correct code is given at the chapter's end.
2. Save your file as tab_ex1.html
3. The next stage is to open the table. To open and close a table, use respectively the <TABLE> and </TABLE> tags within the document's BODY.
<HTML>
<HEAD>
<TITLE>
HTML Table
Design
</HEAD>
</TITLE>
<BODY>
<TABLE>
</TABLE>
</BODY >
</HTML >
4. Save the file and load it in your browser. At first you will notice a blank screen as the table is not visible. A border and rows may be added to make the table visible. If you do not specify a border for the table, it will be displayed without borders. When adding a border, its size can be defined in pixels, for example: <TABLE border=10 style= “width: 80%” >. Notice the use of the width attribute to set the table to a width of 80% of the screen's size (this can also be defined in pixels). However, it is worth noting that the border attribute is on its way out of the HTML standard! It is better to use CSS by first creating a <style> tag within the <head> tag then
leave using only the style attribute within the table tag. ‘td’ stands for ‘tabular data’ and ‘th’ stands for ‘tabular header’.
<style>
table, th, td {
border: 1px
solid black;
}
</style>
…..
<TABLE style=
“width: 80%” >
5. The <TR> tag is used to add rows. Each row is composed of several data cells. Their dimensions can be defined using width and height attributes: <TD width=25% height=20 bgcolor="darkred"> Notice that the cell's colour can also be defined. Try to create the table below before you look at the solution code under Discussion and
Answers at the end of the chapter.

Figure 5.1: Table with one row and two columns
6. Reopen the file tab_ex1.html in your text editor and make the following amendments to <TABLE> and <tr> tags.
Note the <CENTER> tag centers the table horizontally and it also centers the text within each cell in the row.
<TABLE style= "width: 80%" align = "center">
<tr align = "center">
7. Save this file as tab_ex2.html and view it in your browser. It should look as below.

Figure 5.2: Table with centered text
8. We can see that the text is still not given any specific font. HTML <FONT> tag is deprecated in version 4.0, onwards (hence it is not supported in HTML5) and now all fonts are set by using CSS. Try to assign the Comic Sans MS font by making the following addition to the style section. Save the file as tab_ex4.html.
font-family: Comic Sans MS;
This sets all the text in in each cell to have the same font. What if you want to have different fonts in each cell?
To do this, you can use the <p style > tag within each <TD> tag. Modify your <TD> tags to the following:
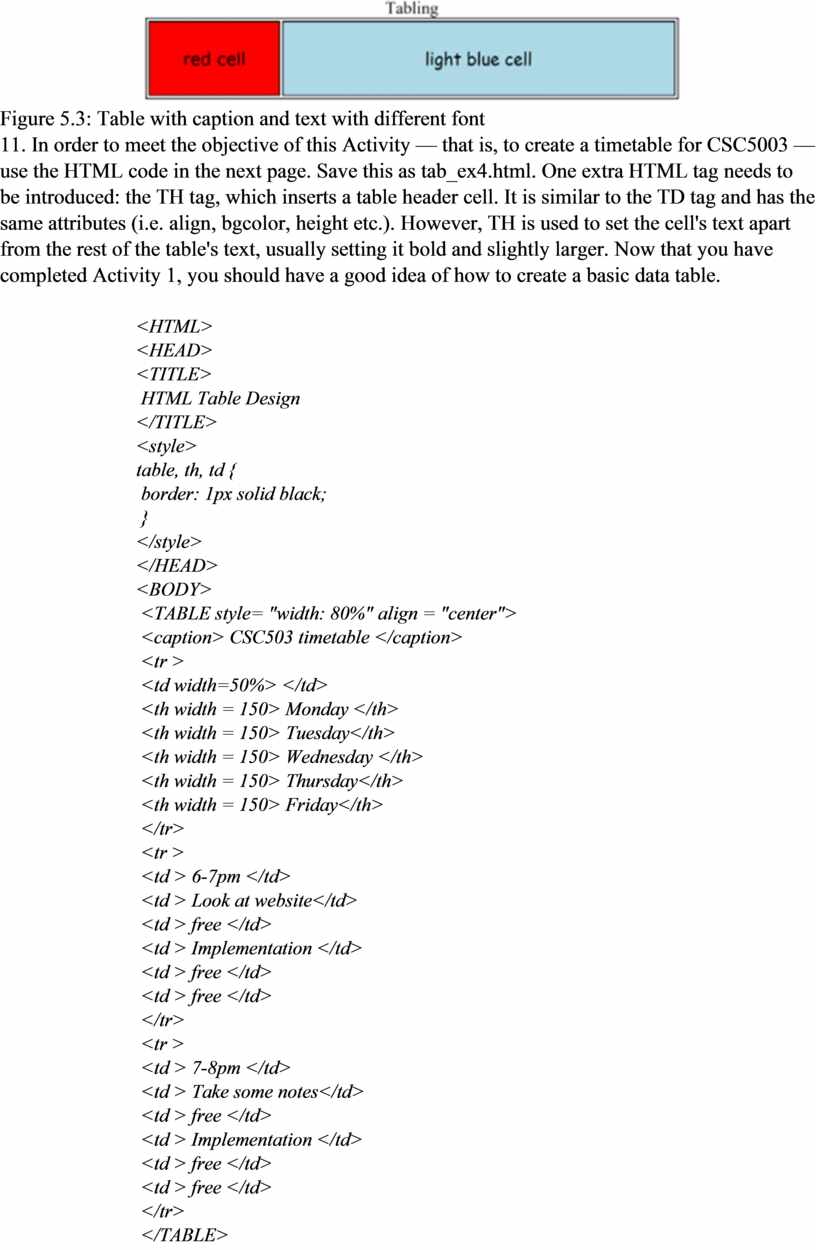
<TD width=25% height=70 bgcolor="red"> <p style="font-family: verdana">red
cell </p> </td>
<TD width=75% bgcolor="lightblue"> <p style="font-family: Comic Sans MS">
light blue cell </p></td>
9. To add a caption to a table use the <caption> tag within the <table> body. This caption appears on top of the
table. Add the caption “Tabling” to your table thus:
<caption> Tabling </caption>
10. Save the file as tab_ex3.html and view it in your browser. It should look as below.

Figure 5.3: Table with caption and text with different font
11. In order to meet the objective of this Activity — that is, to create a timetable for CSC5003 — use the HTML code in the next page. Save this as tab_ex4.html. One extra HTML tag needs to be introduced: the TH tag, which inserts a table header cell. It is similar to the TD tag and has the same attributes (i.e. align, bgcolor, height etc.). However, TH is used to set the cell's text apart from the rest of the table's text, usually setting it bold and slightly larger. Now that you have completed Activity 1, you should have a good idea of how to create a basic data table.
<HTML>
<HEAD>
<TITLE>
HTML Table Design
</TITLE>
<style>
table, th, td {
border: 1px solid black;
}
</style>
</HEAD>
<BODY>
<TABLE style= "width: 80%" align = "center">
<caption> CSC503 timetable </caption>
<tr >
<td width=50%> </td>
<th width = 150> Monday </th>
<th width = 150> Tuesday</th>
<th width = 150> Wednesday </th>
<th width = 150> Thursday</th>
<th width = 150> Friday</th>
</tr>
<tr >
<td > 6-7pm </td>
<td > Look at website</td>
<td > free </td>
<td > Implementation </td>
<td > free </td>
<td > free </td>
</tr>
<tr >
<td > 7-8pm </td>
<td > Take some notes</td>
<td > free </td>
<td > Implementation </td>
<td > free </td>
<td > free </td>
</tr>
</TABLE>
</BODY >
</HTML >
Here are instructions on how to organise and display data in a table:
1. Insert the <TABLE> tag and decide on the table's dimensions (if required)
2. Add a row using the <TR> tag
3. In the newly created row, insert a cell <TD> with the necessary dimensions and other attributes
4. Add the data to be displayed
5. Terminate the data cell </TD>
6. Repeat steps 3-5 as necessary
7. Terminate the row </TR>
8. Repeat steps 2-7 until all the necessary rows have been added
9. Terminate the table </TABLE>
Скачано с www.znanio.ru

Материалы на данной страницы взяты из открытых источников либо размещены пользователем в соответствии с договором-офертой сайта. Вы можете сообщить о нарушении.