Поделиться

Educational:
- acquire the initial skills for creating the simplest Internet documents;
- learn how to format the generated web pages
Educational:
- education of information culture of students, attentiveness, accuracy, discipline, perseverance;
- form the elements of a scientific worldview
Developing:
- develop visual-figurative thinking, memory and the ability to compare and analyze
Occupation type: combined
Technical means: IBM / PC computers
Software: operating system WINDOWS 7 / Vista,
Notepad, Internet Explorer Browser
Comment. To complete the task, a KREMLIN folder with working material must be prepared, in which to include the files:
1) text file for web page.txt (created in Notepad)
2) figure cvetok.jpg
3) music file mtv-1.mp3
4) A quick reference to tags Appendix 1
5) Color chart Appendix 2
Lesson plan:
I. Org. moment. II. Knowledge update III. Implementation of laboratory and
practical work on the topic.
IV. Homework V. Lesson
summary.
Lesson flow: I. Org. moment.
Greetings, checking those present. Explanation of the course of the lesson.
II. Knowledge update.
The Web is a means of presenting information on the Internet. Information can be presented in the form of texts, pictures, audio and video clips. At the same time, the Web is a technology for accessing information resources of the Internet located on multiple Web servers. In general, the Web is a hypertext information environment that uses the accepted hypertext markup language and supports various Internet protocols for accessing its information resources. Any protocol is a set of rules that are used by computers to exchange information. The most common Internet protocol is HTTP (Hyper Text Transfer Protoсol). FTP (for attaching and uploading files), FILE (for accessing files on local drives), protocol for e-mail and some others are used.
HTML (HyperText Markup Language) is the language in which Web pages are created. HTML documents can be viewed by various types of Web browsers. When a document is created using HTML, a Web browser can interpret the HTML to highlight the various elements of the document and process them first. Using HTML allows you to format documents for presentation using fonts, lines, and other graphic elements on any system that views them.
Web pages can be created using
1) a regular text editor;
2) an editor that can save in HTML format;
3) specialized editor;
4) specialized system.
HTML documents are saved to disk as regular ASCII text documents. To recognize Web pages by their names, it is common to designate such files using the extensions .HTM (for Windows 3.1) or .HTML (for Windows 95/98 / NT / XP, Macintosh and Unix).
In addition to useful text, HTML documents use special escape sequences of characters - tags.
Most often, tags are used in pairs, surrounding the marked-up pieces of text. These tags are called containers. The closing tag differs from the initial tag only by the presence of the "/" character, added before the tag name. When interpreting tags, the browser does not distinguish between lowercase and uppercase letters. Therefore, the tags themselves can be typed in any register. Often a parameter (attribute) is optional and can be omitted.
III. Implementation of
laboratory and practical work.
1. Source files: located in the Flowers folder
Before completing the task, copy all files from the FLOWERS folder to your working folder.
2. Download the Notepad program (START - Programs - Standard)
3. Open the finished text file "for web page.txt"
Comment.At each step, you will add a new tag - it is in bold. The rest of the tags remain unchanged.
4. At the beginning of the text place a tag indicating that this document is HTML-text (ie, a required tag for a Web page):
<html>
...
text
...
</html>
5. Creating the header of the Web page:
<html>
<head>
<title> Favorite flowers </title> (page title)
</head>
...
text
...
</html>
6. Save the document in your working folder under the name indeх.htm - to do this, run the command File - Save As
7. Open the Internet Explorer program (START - Programs). We will work autonomously!
Open a Web page - command File - Open; select the required file and click on the "Browse ..." button
Comment. You will continue editing the index.htm file without closing Internet Explorer: to do this, switch to the Notepad program through the taskbar, in which the index.htm file is open.
8. Document body definition:
for this it is necessary to insert tags <body> ... </body>
The page will look like:
<html>
<head>
<title> Favorite flowers </title>
</head>
<body>
...
text
...
</body>
</html>
Comment. Save the file being edited in Notepad (File - Save) and, switching through the taskbar to Internet Explorer, execute the View - Refresh command in the browser (or click the Refresh button).
9. Divide the text into several paragraphs (we will make 6 paragraphs):
for thisthere is a <br> tag (its effect is similar to pressing the Enter key in the Word processor). Place a <br> tag before words:
1) "The flower is ..."
2) "The exclusive role of the flower ..."
3) "A flower being unique ..."
4) "The smallest flowers ..."
10. Format the red line: for this you need to insert several space characters & nbsp; (insert 4 spaces) - after each <br> tag and before the beginning of all text - i.e.
<br> & nbsp; & nbsp; & nbsp; & nbsp;
11. Insert one blank line between paragraphs - for this add another tag <br>
12. Align paragraphs in width: to do this, put the <p align = "justify"> tag in front of the text, and the </p> tag after the text
13. Insert a title to the text: to do this, after <body>, put the <h1> Flowers </h1> tag and align it to the center of the page - add this tag to get <h1 align = "center"> Flowers </ h1>
Comment.By changing the number from 1 to 6, you can get headings of six levels. Try it, not forgetting the remark of item 7.
14. Changing the page background and text color: add to the <body> tag
![]() <body bgcolor = "# f0e68c" text = "#
191970">
<body bgcolor = "# f0e68c" text = "#
191970">
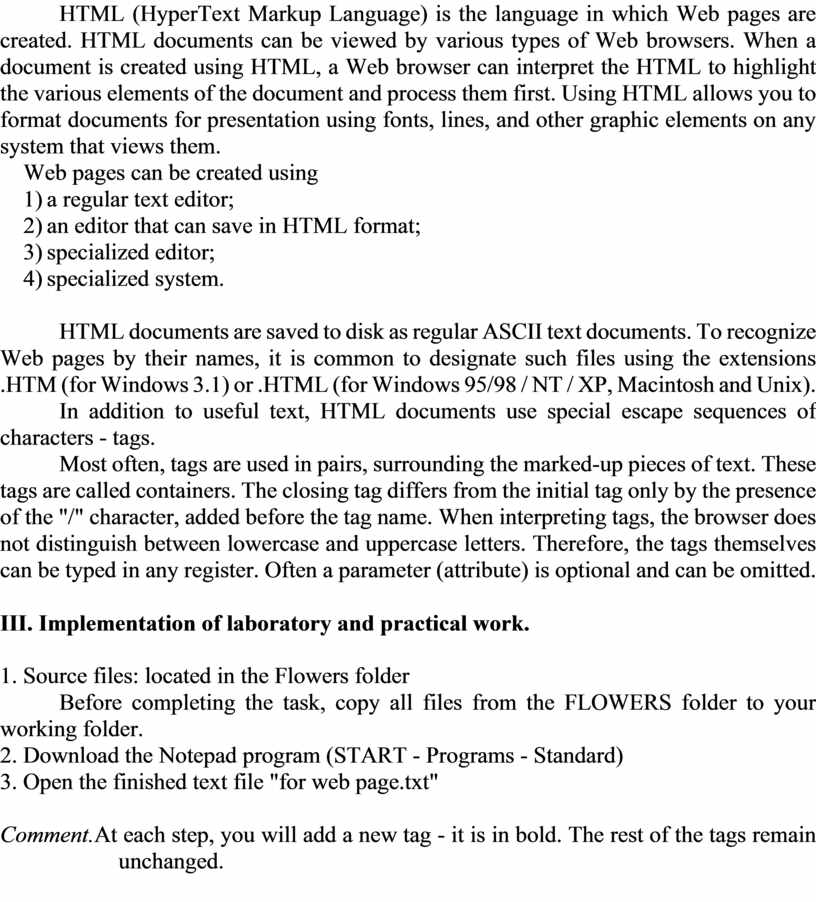
Comment.The background and text color code can be selected by others. Color recording - RGB
|
Colour |
#RRGGBB (code) |
Colour |
#RRGGBB (code) |
|
Black— black |
#000 000 |
Рurple - purple |
# FF00FF |
|
White - white |
#Ffffff |
Yellow - yellow |
# FFFF00 |
|
Red— red |
# FF0000 |
Вrown - brown |
# 996633 |
|
Сreen - green |
# 00FF00 |
Оrange - orange |
# FF8000 |
|
Azure - turquoise |
# 00FFFF |
Violet - purple |
# 8000FF |
|
Blue - blue |
# 0000FF |
Gray - gray |
# А0А0А0 |
A more complete list of colors - see the file Appendix 2.
View the Web page after making changes (do not forget about the remark of item 7)
15. The location of the text on the screen: the edited page, when viewed in a browser, has a drawback - too wide text, which is inconvenient to read. To "narrow" the text, you can use a table with invisible borders to mark up the page (bolder attribute).
After the <body ...> tag, insert the tags of the table <table>, which consists of one line <tr> and three cells <td> in this line:
<table bolder = 0>
<tr>
<td width = "10%"> </td>
![]() <td width = "80%">
<td width = "80%">
….
Heading
Text
...
</td>
<td width = "10%"> </td>
</tr>
</table>
</body>
16. Changing the font style (ie highlighting fragments of text): highlight the words "Flower" (1st paragraph) - in bold, 3rd paragraph - in italics. To do this, put tags in the text
<B>Flower </B> and <I> ... </I>
Comment. Ways to highlight text: <B> - bold, <I> - italic, <U> - underline (pair tags! Do not forget to put the closing tag)
17. Changing the font size: <font size = "5"> text </font>
Comment. The number can be changed from 1 to 7: 7 is the largest font, 1 is the smallest
Make font 5 for the 1st paragraph, font 4 for the 4th paragraph
Inserting a picture: after the tag <h1 align = "center"> FLOWERS </ h1> insert a tag
<p align = "center"> <img src = "kreml.jpg"> </p>(insert the picture in the center right after the title)
Attention !The cvetok.jpg image must be in the same working folder where you saved your web page. The image format must be jpeg.
For this copy the cvetok.jpg picture from the Flowers folder to your working folder.
18. Save your changes in Notepad and view the Web page in Internet Explorer.
19. Insert "creeping line": after the heading <h1 align = "center"> Flowers </h1> insert tags
<marquee
height = 30 width = 100%
hspase = 5 vspase = 5 align = middle
bgcolor = yellow
direction = left loop = infinite behavior = scroll
scrollamount = 5 scrolldelay = 100> <font size = "5">
Write down your last name, first name</font>
</marquee>
<marquee - opening tag;
height = height (in pixels) and width = width (in pixels or percentages) of the crawl box;
hspase = and vspase = spacing (in pixels) horizontally and vertically between the text and the edges of its box;
align = position of the text in the creeping line: top - top, bottom - bottom, middle - middle
bgcolor = allows you to set the background color;
direction = determines the direction of movement of the "creeping line": left - from right to left, right - from left to right
loop = infinite - "creeping line" is present all the time while the page is being viewed;
scrollamount = the length, in pixels, that the text moves in one tick;
scrolldelay = the amount of pause between individual bars of text movement (in
kundas; 1000 - 1 second pause)
<font size = "5"> Write down your surname, first name </font> - font size of the text
</marquee> - closing tag
20. Inserting divider bars: <hr> tag
before the second paragraph insert the tag <hr size = 5 widht = 200 noshade> - the thickness and length of the strip; noshade - so that the strip is dark
Remove tags <br> <br> - two blank lines before the second paragraph
21. Since after inserting a separator bar, the alignment is broken (all paragraphs, except the first, will be aligned to the left), then it is necessary to add the <p align = "justify"> tag after the <hr> tag
22. Insert a background sound: after the tag <body bgcolor = "# f0e68c" text = "# 191970"> insert a tag
<bgsound src = "mtv-1.mp3" loop = infinite>- music will sound as long as the file is displayed on the screen. The sound file mtv-1.mp3 must be in your working folder (copy it from the Flowers folder)
Don't forget to save the assignment.
IV. Homework
Notes in a notebook.
V. Lesson summary.
Summing up the lesson. View completed tasks. Answer students' questions.
Материалы на данной страницы взяты из открытых источников либо размещены пользователем в соответствии с договором-офертой сайта. Вы можете сообщить о нарушении.